
Making fermented salsa at home is easier than you think, and with a little patience, you can enjoy a tangy, healthy condiment that’s packed with flavor. Fermentation brings out the best in ingredients, transforming raw vegetables into a rich, umami sauce that’s perfect for topping tacos or using as a dip. But what exactly happens during fermentation, and how can you troubleshoot common issues? By understanding the process of lactic acid fermentation, you’ll be able to create a fermented salsa recipe that suits your taste preferences. This guide will walk you through the step-by-step process of making fermented salsa at home, covering topics such as ingredient selection, preparation, and storage.
Understanding the Benefits of Fermentation
Fermentation is a process that not only enhances flavors but also unlocks numerous health benefits, making it a game-changer for your fermented salsa recipe. Let’s explore the advantages of incorporating fermentation into your cooking.
What is Fermentation and How Does it Affect Food?
Fermentation is a natural process that involves the action of microorganisms, such as bacteria and yeast, on food. These microbes feed on the sugars present in the food, producing lactic acid as a byproduct. This increase in acidity creates an environment that’s unfavorable for the growth of most pathogens, thereby preserving the food.
The fermentation process has several benefits when it comes to food preservation and nutritional enhancement. For one, it breaks down some of the tougher fibers in food, making it easier to digest. Fermented foods also tend to have a higher nutrient content than their unfermented counterparts due to the breakdown of cell walls and the release of bound nutrients.
In the context of salsa making, fermentation is particularly useful because it allows for the development of complex flavors and textures without adding any extra ingredients. By allowing the natural microbes present in the ingredients to do their work, you can create a more nuanced and balanced flavor profile that’s characteristic of fermented foods. This process also helps to reduce the overall acidity level in the salsa, making it more palatable to those who prefer a milder taste.
Preparing Your Ingredients for Fermentation
When it comes to making fermented salsa, choosing the right ingredients is crucial. For tomatoes, use a mix of ripe and unripe varieties, as they will contribute different flavors and textures. Roma or Plum tomatoes are ideal for their dense flesh and low water content. On the other hand, cherry tomatoes can be too sweet and may not ferment properly.
For peppers, select firm, fresh ones with no signs of mold or soft spots. Jalapeños or Serrano peppers add a nice balance of heat and flavor. When it comes to onions and garlic, use fresh bulbs rather than powder or dried versions, as they will break down more easily during fermentation. For spices, keep it simple with cumin, oregano, and salt.
Consider using fresh ingredients over canned or frozen ones, but don’t rule out the latter entirely. Canned tomatoes, for instance, can be a good option if you’re short on time or can’t find fresh ones in season. When using canned goods, just make sure they’re low-sodium and free of added preservatives.
In general, choose ingredients that are in season to ensure optimal flavor and texture. A small batch of fermented salsa made with high-quality, fresh ingredients will always taste better than one made with lower-grade ingredients, regardless of the fermentation time.
Setting Up Your Fermentation Station
Before you start making your fermented salsa, it’s essential to set up a clean and sanitized fermentation station that will help create the perfect environment for your batch to thrive. This includes selecting the right equipment and storage containers.
Creating a Suitable Environment for Fermentation
Temperature control is crucial for successful fermentation. Aim for a consistent temperature between 64°F and 75°F (18°C to 24°C), with the ideal range being around 70°F (21°C). This narrow window allows the natural bacteria on the ingredients to thrive without promoting unwanted contaminants. To maintain this temperature, you can place your vessel in a pantry or cupboard away from direct sunlight and heat sources.
Air circulation is also essential, as it helps to distribute heat evenly and prevent the buildup of carbon dioxide gas produced during fermentation. You can achieve good air circulation by placing the vessel on a wire rack or tray, allowing for about 1-2 inches (2.5-5 cm) of space between the vessel and any surface.
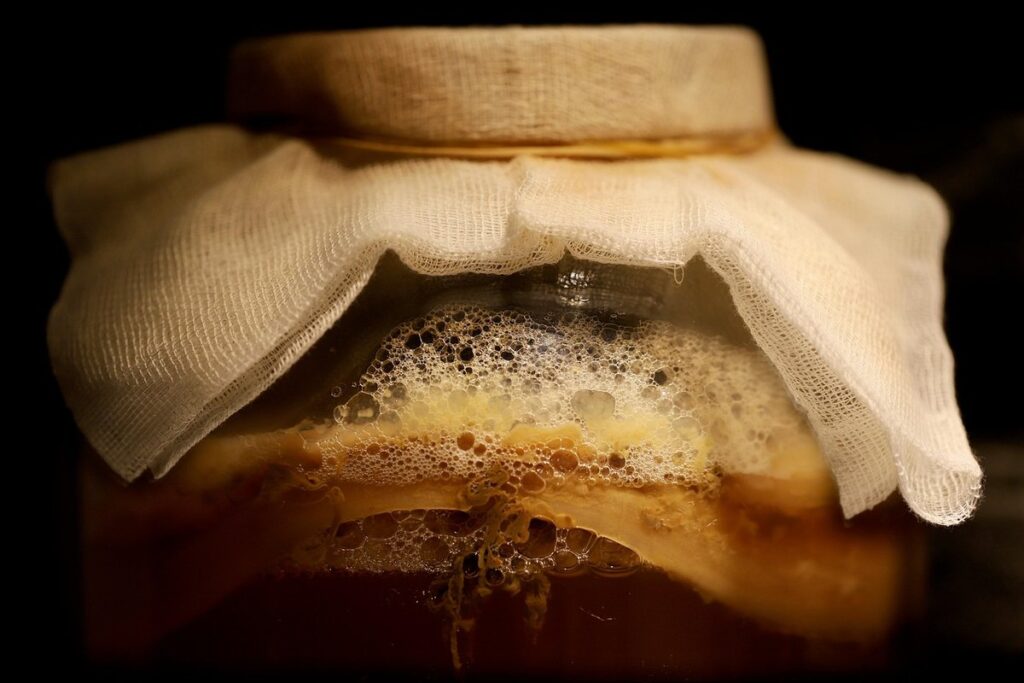
Maintaining optimal humidity levels is equally important. The ideal relative humidity for fermentation is between 60% to 80%. You can achieve this by covering the vessel with a clean cloth or paper towel, securing it with a rubber band. This will help to retain moisture without creating an overly humid environment that fosters mold growth.
By controlling temperature, air circulation, and humidity levels, you’ll create an optimal environment for fermentation to occur. Regularly check on your setup and make adjustments as needed to ensure the perfect conditions for your fermented salsa recipe.
Choosing the Right Vessel for Fermentation
When it comes to choosing a vessel for fermentation, you have several options. Glass jars are a popular choice due to their transparency and ease of cleaning. They allow you to monitor the fermentation process and observe the development of carbonation. However, glass can be heavy and may require additional support to prevent breakage.
Ceramic crocks, on the other hand, are ideal for longer-term fermentations as they provide a stable environment with minimal temperature fluctuations. They also have a natural pH buffer that helps maintain an acidic environment conducive to fermentation. A drawback of ceramic crocks is their weight and potential difficulty in cleaning.
Food-grade plastic buckets are another option, offering flexibility and ease of handling. They can be cleaned thoroughly and are often less expensive than glass or ceramic options. However, some plastic containers may contain chemicals that can leach into the fermented salsa, compromising its quality. Always ensure that any plastic vessel is specifically labeled as food-grade to avoid contamination risks.
When selecting a vessel, consider factors such as weight, ease of cleaning, and temperature stability. A good fermentation vessel should allow for easy monitoring and maintenance while providing an optimal environment for the growth of beneficial microbes.
The Fermentation Process: A Step-by-Step Guide
Fermenting salsa is a multi-step process that requires patience, attention to detail, and some basic equipment. Let’s break down each step of the fermentation process for perfect fermented salsa.
Preparing the Salsa Mixture for Fermentation
When combining the ingredients for fermented salsa, it’s essential to chop and mix them into a smooth consistency. Start by measuring out 2 cups of diced tomatoes, 1 cup of chopped red onion, 1/4 cup of chopped fresh cilantro, 1 jalapeño pepper seeded and finely chopped, and 1 lime juiced.
For the perfect balance of flavors, use a ratio of 3 parts tomato to 1 part onion. You can adjust this proportion to suit your taste preferences. If you prefer a milder salsa, reduce the amount of jalapeño or omit the seeds for less heat.
Combine all the chopped ingredients in a bowl and stir until they’re evenly distributed. Make sure to mash some of the tomatoes with a fork to release their natural pectins, which will help thicken the mixture during fermentation. If using a blender or food processor to mix the ingredients, be cautious not to over-process, as this can create an unpleasant texture.
To ensure a smooth consistency, aim for a chunky puree rather than a completely smooth paste. This will allow the flavors to meld together and develop during the fermentation process. With your salsa mixture prepared, you’re ready to move on to the next step in creating delicious fermented salsa.
Monitoring and Maintaining Fermentation
Fermentation is a dynamic process, and regular checks are crucial to ensure it’s progressing as expected. Start by inspecting the surface of the salsa mixture for signs of fermentation, such as bubbles forming on the skin or foam accumulating around the edges. A sour aroma, often compared to vinegar, will also become noticeable.
If you notice these signs, check the fermentation vessel daily to monitor progress. Use a clean utensil to gently press down on the surface – if it springs back quickly, fermentation is happening too rapidly. Conversely, if the mixture feels soft and mushy, it may be under-fermented.
To maintain balance, check the salsa’s texture regularly. When it reaches your desired consistency, stop monitoring and store it in the refrigerator to slow down fermentation. For a more intense flavor, allow it to ferment for 24-48 hours longer. Be cautious not to overdo it – over-fermentation can lead to an unpleasantly sour taste.
When assessing fermentation progress, consider using the “bubbles test”: count the bubbles rising to the surface within a minute. A moderate rate is typically around 10-20 bubbles per minute. This can help you fine-tune your fermentation time and avoid common pitfalls.
Troubleshooting Common Issues in Fermented Salsa Making
We’ve all been there: a batch of fermented salsa that’s too sour, too salty, or just plain won’t ferment. Let’s tackle these common issues and get your fermentation on track.
Identifying and Addressing Over-Fermentation
Over-fermentation can be a significant issue when making fermented salsa. One of the first signs is often an unpleasantly sour or vinegary smell. This is usually accompanied by off-flavors, which can range from slightly tangy to downright bitter. In severe cases, you may even notice mold growth on the surface of the salsa.
If you catch over-fermentation early, there’s a good chance you can salvage the batch without having to start over. The first step is to stop fermentation immediately by placing the jar in the refrigerator at 40°F (4°C) or below. This will slow down the fermentation process and prevent further damage.
Next, taste the salsa regularly until it reaches your desired level of sourness. Be cautious not to eat too much, as over-fermented foods can be quite acidic. If the flavor is still unpalatable after a few days in the refrigerator, consider using the salsa as an ingredient in another recipe or freezing it for later use.
When storing fermented salsa, make sure to check on it regularly and address any issues promptly. This will help prevent over-fermentation from occurring in the first place.
Dealing with Under-Fermentation or Lack of Flavor Development
Under-fermentation can result from inadequate temperature control or insufficient time. Temperature fluctuations can slow down fermentation, while consistently warm temperatures (typically between 68°F and 72°F) allow for optimal lactic acid production. If the environment is too cool, it may take longer to achieve desired flavor development.
To address under-fermentation, you can increase the storage temperature within a reasonable range or extend the fermentation time. For example, if your salsa mixture has been fermenting at room temperature (around 70°F) for 5 days without noticeable flavor change, consider moving it to a warmer spot (around 75°F) for an additional 3-4 days.
It’s also essential to monitor the specific gravity of the salsa using a hydrometer. A consistent decrease in specific gravity indicates lactic acid production and fermentation progress. If the readings remain steady or show little change, it may be necessary to re-evaluate your storage conditions or recipe composition.
When increasing temperature, ensure it doesn’t exceed 75°F to avoid over-fermentation risks. Conversely, if extending time, keep a close eye on the salsa’s overall condition and specific gravity readings to prevent spoilage. Be prepared to adjust storage locations based on ambient temperatures to optimize fermentation progress.
Advanced Techniques for Enhancing Fermented Salsa Flavors
As you’ve mastered the basics of fermented salsa, it’s time to take your recipe to the next level by experimenting with advanced techniques that will elevate its complex flavors. We’ll explore some expert tips and tricks for depth and nuance.
Experimenting with Different Spices and Seasonings
When experimenting with different spices and seasonings, keep in mind that a little can go a long way. Start by adding small amounts of unique ingredients to your fermented salsa recipe, such as smoked paprika, ground cumin, or dried oregano. You can also try using fresh herbs like cilantro, parsley, or basil.
Consider the flavor profile you want to achieve and choose spices that complement or contrast with it. For example, if you’re making a smoky fermented salsa, add some chipotle peppers in adobo sauce for an extra kick of heat. If you prefer a brighter, fresher taste, try adding some lime juice or zest.
Some other ingredients to experiment with include Korean chili flakes (gochugaru), Indian garam masala, or Middle Eastern sumac. You can also use spices and seasonings that are commonly used in your favorite dishes, such as Mexican adobo seasoning or Italian oregano.
When introducing new spices, be mindful of the fermentation time. Some ingredients, like citrus zest, may break down quickly during fermentation, while others, like whole spices, may retain their flavor and aroma for longer. Keep an eye on your salsa’s flavor development and adjust the spice levels to taste.
Using Various Fermentation Methods: Lacto-Fermentation vs. Wild Fermentation
Lacto-fermentation and wild fermentation are two distinct approaches to creating fermented salsa. Lacto-fermentation relies on the presence of lactic acid bacteria, typically introduced through a starter culture or brine, to ferment the mixture. This method is more controlled and predictable, resulting in a consistent flavor profile and texture.
In contrast, wild fermentation allows the natural microorganisms present on the ingredients to dominate the fermentation process. This approach can produce unique and complex flavors, but it also comes with a higher risk of contamination or over-fermentation. Wild fermentation often requires more attention and monitoring to achieve optimal results.
When deciding between these two methods, consider your desired level of control and the flavor profile you’re aiming for. Lacto-fermentation is ideal for those who want a consistent outcome, while wild fermentation offers opportunities for experimentation and creativity. If you do choose to use wild fermentation, make sure to handle the ingredients properly and monitor the mixture closely to avoid any issues.
Some key factors to consider when using wild fermentation include temperature control, ingredient selection, and monitoring pH levels. A small minority of recipes may benefit from a combination of both methods for added complexity.
Safety Guidelines for Consuming Fermented Salsa
When working with fermented foods, it’s essential to be aware of the potential risks and take necessary precautions to ensure a safe and enjoyable experience. This section covers key guidelines for safely consuming your homemade fermented salsa.
Understanding Food Safety Risks Associated with Fermentation
Improper fermentation practices or contamination can pose significant food safety risks. When fermenting salsa, it’s essential to handle and store it properly to minimize these risks. Contamination can occur through airborne pathogens, such as bacteria, mold, or yeast, which thrive in warm, humid environments. If the fermentation vessel isn’t clean, these microorganisms can multiply rapidly, leading to off-flavors, textures, and potentially toxic compounds.
To mitigate this risk, ensure your fermentation station is well-ventilated, dry, and free from strong-smelling foods that might attract pests. Regularly inspect your equipment and vessels for signs of wear or damage, replacing them as needed. Store fermented salsa in airtight containers to prevent contamination by airborne pathogens.
Additionally, be aware of potential contaminants in the ingredients themselves. For instance, improperly washed vegetables can harbor bacteria like E. coli or Salmonella. Always wash and sanitize your ingredients before adding them to the fermentation vessel.
Regularly check for signs of spoilage during fermentation, such as mold growth, slimy texture, or a strongly acidic smell. If you notice any of these symptoms, discard the salsa immediately and start over with fresh ingredients.
Precautions When Serving or Storing Fermented Salsa
When serving fermented salsa, it’s essential to keep food safety guidelines in mind. Start by considering the serving size: a small amount is sufficient due to its strong flavor and potential heat level. A good rule of thumb is to use about 1-2 tablespoons per serving.
For storage, refrigeration is crucial to maintain quality and prevent spoilage. Transfer fermented salsa to an airtight container and store it in the refrigerator at a temperature below 40°F (4°C). When stored properly, fermented salsa can last for several months. However, its flavor and texture may change over time, so use your best judgment when deciding whether it’s still safe to consume.
Freezing is also an option, but it’s not recommended for fermented salsa with high water content, as ice crystals can form and affect the texture. If you do choose to freeze, make sure to transfer the salsa to a freezer-safe container or freezer bag and label it clearly. When thawing, allow the salsa to come to room temperature before serving.
In general, if you notice any off-odors, sliminess, or mold growth, discard the fermented salsa immediately. Regularly inspect your stored salsa for signs of spoilage, and always err on the side of caution when it comes to food safety.
Frequently Asked Questions
Can I Use a Blender to Chop My Ingredients Before Fermenting?
You can use a blender to chop your ingredients before fermenting, but be careful not to over-process them. This can lead to an unpleasant texture and potentially damage the enzymes responsible for fermentation.
When blending, pulse the ingredients in short bursts to avoid creating too much heat or breaking down the natural fibers of the vegetables. It’s also essential to stop and scrape down the sides frequently to ensure even chopping.
What if I Don’t Have a Dedicated Fermentation Station – Can I Still Make Fermented Salsa?
Yes, you can still make fermented salsa without a dedicated fermentation station. A cooler with temperature control or a yogurt maker can be used as a makeshift environment for fermentation.
However, keep in mind that these alternatives may not provide the optimal conditions for fermentation, and it’s crucial to monitor your mixture closely to prevent over-fermentation or contamination.
How Long Does Fermented Salsa Keep in the Fridge – Can I Store It for Months?
Fermented salsa can be stored in the fridge for several months, but its quality will degrade over time. The exact shelf life depends on factors like storage conditions, acidity level, and personal taste preferences.
As a general guideline, fermented salsa will retain its best flavor and texture within 2-3 months of fermentation. After this period, it may start to develop off-flavors or become too sour.
Can I Use Fermented Salsa as a Marinade for Meats – Is It Safe?
Yes, you can use fermented salsa as a marinade for meats, but be cautious not to introduce new bacteria into the fermentation process. When using fermented salsa as a marinade, make sure it has cooled to room temperature and that the acidity level is suitable for your specific recipe.
Also, always marinate meat in the refrigerator at a temperature below 40°F (4°C) to prevent bacterial growth.

