
Starting with a blank canvas can be intimidating, especially when trying to capture the serene beauty of nature in a simple landscape painting. You’ve probably gazed at breathtaking landscapes and wondered how artists achieve such stunning results, only to find yourself unsure where to begin. Creating simple landscape paintings is a great way for beginners to develop their skills and build confidence in their artistic abilities. In this guide, we’ll cover the essential supplies you need to get started, including brushes, paints, and canvases. We’ll also explore color theory and basic techniques that will help you create depth and atmosphere in your paintings. By mastering these fundamental skills, you’ll be able to take your art to the next level and produce stunning simple landscape paintings that showcase your unique perspective.
Choosing the Right Tools and Materials
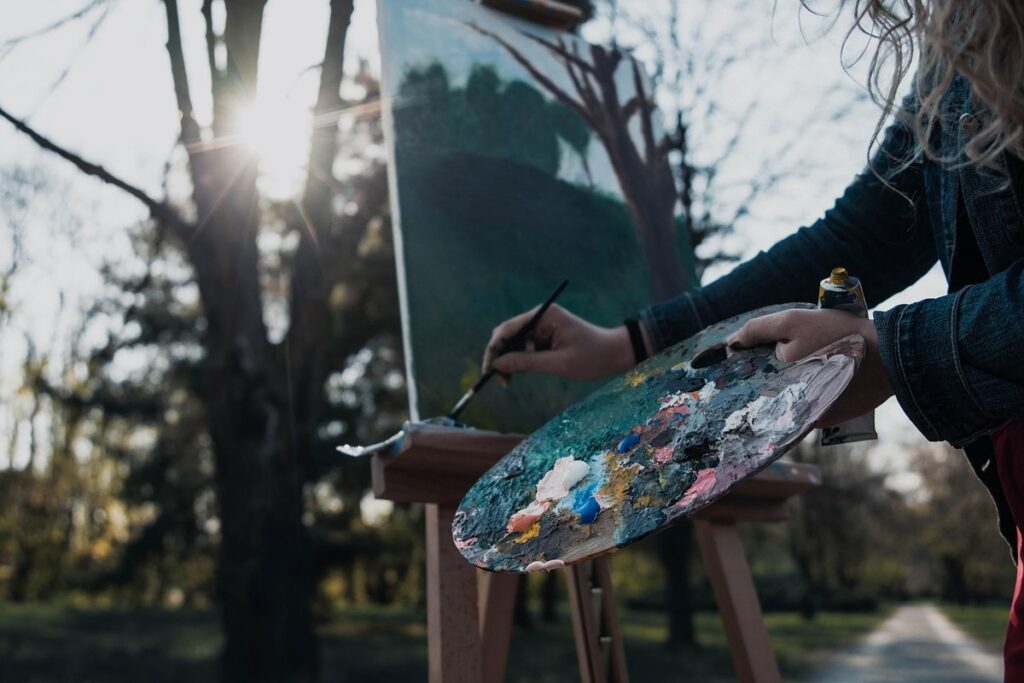
To create stunning landscape paintings, it’s essential to choose the right tools and materials for your project. We’ll walk you through our top picks for a beginner-friendly setup.
Essential Painting Supplies for Landscapes
When it comes to creating simple landscape paintings, having the right painting supplies can make all the difference. You’ll want to start with a few basic brushes that will allow you to achieve soft, blended edges and subtle texture. Look for synthetic or natural fiber brushes in flat, round, and filbert shapes – these will cover most of your landscape painting needs.
Next, choose a canvas or painting surface that suits your style. A medium-weight, cotton-based canvas is ideal for beginners, as it’s easy to work with and forgiving if you make mistakes. Don’t worry too much about the size of the canvas at this stage; start with something manageable (around 16×20 inches) and focus on practicing your techniques.
You’ll also need a selection of paints, including titanium white, yellow ochre, ultramarine blue, and burnt sienna. These colors will provide you with a solid foundation for creating natural-looking landscapes. Consider investing in a basic set of acrylic or oil paints, depending on your preference. Finally, don’t forget to pick up some mediums – these can help you achieve specific effects (such as glazing or texture) without having to mix separate paint colors.
Understanding Color Theory for Landscapes
When painting landscapes, understanding color theory is crucial to capturing the mood and atmosphere of a scene. Warm colors such as orange, red, and yellow evoke feelings of warmth and energy, while cool colors like blue, green, and purple create a sense of calmness and serenity. In landscape painting, it’s common to use warm colors for foreground elements, like trees or rocks, and cool colors for background elements, like sky or water.
The 60-30-10 rule can help you achieve balance in your color palette. Allocate 60% of the dominant color, 30% of a secondary color, and 10% of an accent color to create visual interest. For example, if you’re painting a sunset, use 60% orange for the sky, 30% pink for the clouds, and 10% yellow for the sun.
Color harmony is also essential in landscape painting. Consider using analogous colors, which are next to each other on the color wheel, or complementary colors, which are opposite each other. For instance, pairing blue with its complement orange can create a stunning contrast that draws the viewer’s eye. By understanding and applying basic principles of color theory, you’ll be able to create landscapes that transport viewers to new environments.
Basic Techniques for Landscape Painting
To create beautiful landscape paintings, start by mastering some essential techniques that will help you capture nature’s essence on canvas. These basic methods are a great starting point for your artistic journey.
Mixing Skies and Clouds
When mixing skies and clouds in your landscape painting, it’s essential to capture their soft, gentle appearance. To achieve this, try using a soft blending brush to merge colors together on your canvas. This technique allows you to create subtle gradations of tone and value that evoke the depth and atmosphere of a cloudy sky.
Wet-on-wet methods are another great way to add texture and movement to your clouds. By applying layers of paint while they’re still wet, you can create soft, feathery brushstrokes that catch the eye. Start by loading your brush with a light wash of blue or gray paint, then gently sweep it across your canvas in smooth, curved motions.
To add some visual interest to your clouds, try using drybrushing techniques. This involves dragging a nearly-dry brush across your canvas to pick up and apply pigment. The rough texture created by this method can help break up large areas of cloud cover and give the impression of turbulent weather.
Remember, practice is key when mastering these techniques. Experiment with different brushes, paint combinations, and stroke directions to find what works best for you.
Creating Texture with Brushstrokes
Creating texture in a landscape painting can add depth and visual interest to your work. Drybrushing is one technique you can use to create textured brushstrokes. This involves dragging a almost-dry brush across the canvas, which creates a rough, irregular surface that mimics tree bark or rocky terrain.
Impasto is another way to build up texture in a painting. By applying thick layers of paint with a palette knife or a heavy-bristled brush, you can create raised surfaces that give your landscape added dimensionality. This technique works particularly well for capturing the ruggedness of mountains or the roughness of tree trunks.
Hatching is a more subtle way to achieve texture in a painting. By creating parallel lines with quick, light strokes, you can suggest the roughness of foliage or the smoothness of water. To create hatching brushstrokes, use short, even strokes that follow the contours of your subject. Varying the direction and pressure of these strokes can help to build up texture and create a more expressive landscape.
For beginners, it’s best to practice each technique separately before combining them in a single painting.
Composition and Planning Your Painting
When creating a simple landscape painting, it’s essential to plan out the composition of your scene, considering elements such as horizon line and focal points. Let’s start with the basics of planning a visually appealing landscape.
Understanding the Rule of Thirds and Leading Lines
The rule of thirds is a fundamental composition technique used to create visually appealing landscapes. Imagine dividing your canvas into nine equal parts using two horizontal lines and two vertical lines. Placing important elements along these lines, rather than directly in the center, creates balance and harmony. For instance, place a tree or a mountain at the top left third, and a body of water at the bottom right third. This arrangement leads the viewer’s eye through the painting.
Leading lines are another essential tool for composition. These are visual paths that guide the viewer’s gaze through the landscape. Look for natural features like roads, rivers, or shorelines that can be used to create leading lines. For example, you could paint a winding road leading into the distance, with trees and hills receding in perspective.
When applying these techniques, remember to simplify your composition by focusing on one or two key elements rather than trying to include everything. Use leading lines to lead the viewer’s eye to these focal points, which should ideally be placed along the thirds lines.
Creating Depth with Layering and Atomsphere
When creating depth in landscapes, layering and atmosphere are essential tools at your disposal. Atmospheric perspective is a fundamental concept to grasp: objects appear lighter and more washed out as they recede into the distance. To achieve this effect, use thinner layers of paint or glazes towards the back of your painting. This technique helps create a sense of depth without overwhelming the viewer with complex details.
Misty backgrounds are another way to add depth to your landscapes. Use soft brushstrokes and thin paint to suggest the presence of fog or mist. You can also use white or pale washes to create a hazy atmosphere, which draws the eye into the distance. Consider using a combination of warm and cool colors to create a sense of contrast and visual interest.
To take your depth-creating techniques to the next level, focus on subtle gradations of tone and value. Avoid harsh contrasts and instead opt for gentle transitions between light and dark areas. This will help create a sense of space and atmosphere that draws the viewer in.
Simple Landscape Painting Exercises
To get started with simple landscape painting, try these easy exercises that will help you build confidence and develop your skills as a beginner painter. You’ll be amazed at how quickly you improve!
Capturing Light and Shadow
Capturing light and shadow is a fundamental aspect of landscape painting. To begin with, set up a still-life composition using simple objects such as vases, boxes, and bottles. Place them against a plain background to focus on the interplay between light and form. Observe how shadows fall across the objects, noting their length and depth. Practice rendering these shadows in different colors and textures.
For outdoor sketching, find a spot with an interesting play of light, such as dappled shade or a misty morning scene. Use quick gesture drawings to capture the overall composition and then focus on specific areas where light interacts with form. Pay attention to the way light edges define shapes and create depth. Consider using simple washes to suggest atmospheric conditions like haze or fog.
When painting from observation, break down complex scenes into simpler components, focusing on one area at a time. Use small sketches to block in major elements before refining details. Practice rendering different types of shadows, including those cast by trees, buildings, and other landscape features. By mastering the basics of light and shadow, you’ll be able to create more convincing and engaging landscapes.
Simplifying Complex Landscapes
When tackling complex landscapes, it’s easy to get bogged down in details. But simplicity is key when creating a painting that’s meant to evoke emotion and atmosphere rather than document reality. To simplify a complex landscape, start by reducing the number of elements in your composition. Ask yourself: what are the essential features of this scene? What will draw the viewer’s eye?
Focus on capturing the essence of the landscape, rather than every tree branch or rock. Identify the key elements that define the mood and atmosphere of the scene – perhaps a dramatic sky, a winding path, or a distant mountain range. Use these focal points to create a sense of depth and interest in your painting.
To further simplify your composition, try using visual weights to guide the viewer’s eye through the landscape. This can be as simple as placing a dominant feature, like a large tree or building, off-center and using leading lines to draw the viewer’s eye towards it. By stripping away unnecessary details and focusing on key elements, you’ll create a painting that’s both visually appealing and easy to follow. Remember, simplicity is not about sacrificing detail entirely – but about knowing what to leave out.
Overcoming Common Challenges in Landscape Painting
As you start creating your landscape paintings, you may encounter some common obstacles that can make the process frustrating. Let’s address these challenges together and find simple solutions to overcome them.
Troubleshooting Muddy Colors and Blending Issues
Muddy colors and blending problems can be frustrating issues to encounter while painting landscapes. One common cause of muddy colors is using too many colors on your palette at once. This can lead to an overwhelming mix of hues that don’t work well together. To avoid this, try to limit yourself to a palette of three to five primary colors and use these as the foundation for your entire painting.
When it comes to fixing mistakes, start by assessing what’s gone wrong. Is the color too dark or too light? Are the edges not blending smoothly? Once you’ve identified the issue, make adjustments accordingly. For example, if a section is too dark, try adding a small amount of white paint to lighten it up.
To achieve smooth transitions between colors, use glazing techniques. Glazing involves applying multiple thin layers of transparent paint to build up a deep color. This works particularly well for skies and bodies of water. Start by applying a base layer of color, then allow it to dry before adding subsequent layers. Experiment with different ratios of paint to medium to achieve the desired effect.
A useful tip is to practice glazing on a small scale before applying it to your main painting. This will help you get a feel for how the colors interact and make adjustments as needed.
Managing Time and Progression in Your Paintings
When working on a landscape painting, it’s easy to get caught up in trying to capture every detail of the scene. However, this can lead to frustration and burnout as the painting becomes more complex than you anticipated. To avoid this, try breaking down the scene into manageable sections. Identify key elements such as the horizon line, major shapes, and areas of interest, and focus on one area at a time.
For example, start by blocking in the basic shapes of the landscape with large brushstrokes, then gradually add more detail to each section. This will not only help you manage your time but also ensure that each area is given sufficient attention. Additionally, pace yourself by setting realistic goals and deadlines for completing different stages of the painting.
If you’re finding it difficult to progress, try taking a break or stepping back from the painting to gain a fresh perspective. Remember, simplicity is key in landscape painting, so don’t be afraid to simplify complex scenes by omitting details that aren’t essential to the overall composition. By breaking down your work into smaller tasks and pacing yourself, you’ll be able to complete your painting with less stress and more enjoyment.
Advanced Techniques for Taking Your Landscapes to the Next Level
Now that you’ve mastered simple landscape paintings, it’s time to take your skills to the next level and learn advanced techniques for creating stunning, professional-looking artworks. Let’s explore some expert tips and tricks to elevate your painting game.
Atmospheric Perspective and Anamorphosis
Atmospheric perspective is a technique used to create depth and distance in landscapes by manipulating color and contrast. It’s based on the way light scatters as it travels through the atmosphere, making objects appear lighter and less detailed as they recede into the background. To apply atmospheric perspective in your painting, start by using lighter colors for distant elements, such as mountains or trees, and gradually deepen the tone and detail as you move towards the foreground.
Anamorphosis is a related technique that involves manipulating perspective to create an exaggerated sense of depth. This can be achieved by using converging lines, overlapping forms, or other visual cues to lead the viewer’s eye into the painting. For example, you might paint a winding road that appears to vanish into the distance, or a series of rocks that seem to slope down into the background.
To incorporate these techniques into your simple landscape paintings, try experimenting with different color gradations and value shifts. Use soft brushstrokes to suggest distant forms, and avoid over-detailing in the background.
Incorporating Abstraction and Expression in Your Landscapes
When working on simple landscape paintings, it’s natural to feel constrained by realism and representational accuracy. However, incorporating abstraction and expression can add a new layer of depth and meaning to your art. Abstraction doesn’t have to mean complete departure from reality; instead, it can be used to emphasize certain aspects or moods in the scene.
To balance realism with creative interpretation, try focusing on capturing the essence of the landscape rather than its exact likeness. Simplify complex elements, like foliage or architecture, by reducing them to basic shapes and forms. This will allow you to concentrate on conveying atmosphere and mood through color, texture, and composition.
For example, instead of painting every leaf and branch, focus on suggesting their presence with loose brushstrokes or subtle color gradations. Similarly, capture the misty, dreamlike quality of a mountain range by blurring edges and softening colors. By introducing elements of abstraction, you can create more expressive and evocative landscapes that invite the viewer to interpret and connect with the scene on a deeper level.
Frequently Asked Questions
Can I use digital painting tools to create simple landscape paintings?
Yes, digital painting tools can be used to create stunning simple landscapes. In fact, they offer a lot of flexibility and convenience, especially for beginners who want to experiment with different techniques without wasting physical materials. However, keep in mind that some effects may not translate as well as they would on canvas.
How do I know when my painting is “good enough”?
A good rule of thumb is to set a deadline for yourself and stick to it. This will help you avoid getting bogged down in details and overthinking your work. Also, remember that the goal of simple landscape painting is to capture the essence of a scene, not to create a perfectly realistic representation.
Can I use photography as reference for my landscapes?
Yes, using photographs can be a great way to get started with simple landscape painting. However, make sure you’re not simply tracing or copying the image – try to interpret and simplify it in your own unique way. This will help you develop your skills and style more quickly.
What if I’m struggling to mix realistic skies and clouds?
Don’t worry if it takes some practice to get the hang of mixing skies and clouds! It’s all about experimentation and finding the right combination of colors and techniques for your specific scene. Try practicing with simple exercises, like painting a single cloud or sky gradient, before moving on to more complex compositions.
Can I use simple landscape painting as a way to relax and unwind?
Yes, simple landscape painting can be a great way to unwind and relax – it’s all about focusing on the process and enjoying the journey, rather than getting caught up in perfectionism. Try setting aside dedicated time for painting each week and see how it affects your mood and stress levels!

