
Are you tired of using commercial Easter egg dyes that are filled with harsh chemicals? Why not try creating your own unique, eco-friendly dyes using natural ingredients like fruits and vegetables instead? Dyeing eggs naturally is a great way to get creative while also being kind to the environment. With just a few simple materials, you can create beautiful, sustainable Easter egg decorations for your family and friends.
Some common natural dye options include beets, turmeric, coffee, and spinach, which can produce a range of vibrant colors from pink to yellow to brown. But before you start experimenting with these ingredients, it’s essential to understand the techniques and safety precautions involved. In this article, you’ll learn how to create unique Easter egg dyes using natural materials, including expert tips on getting the best results and avoiding any potential mess or damage. By the time you’re done reading, you’ll be able to dye your eggs naturally with confidence.
Choosing the Right Ingredients
When it comes to natural Easter egg dyeing, selecting the right ingredients is crucial for achieving vibrant colors and ensuring a fun experience. Let’s start by discussing the types of dyes and natural materials you can use.
Natural Dyes from Fruits and Vegetables
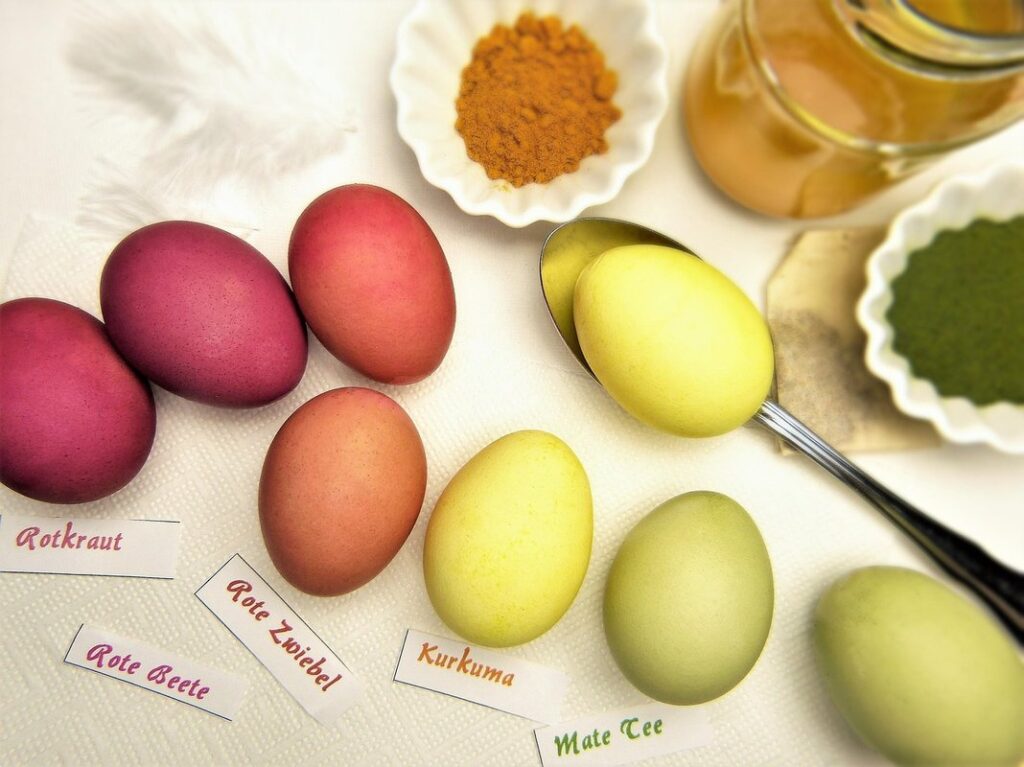
Turmeric, beets, and blueberries are just a few of the many fruits and vegetables you can use to create natural dyes for Easter eggs. When boiled, turmeric creates a vibrant yellow color that’s perfect for springtime. To dye eggs with turmeric, boil 1-2 teaspoons of turmeric powder in 4 cups of water for about 10 minutes. The longer it boils, the deeper the color will be.
Beets produce a range of colors from pink to deep red, depending on the type and amount used. For a soft pastel pink, try boiling 2-3 beets in 4 cups of water for 20-30 minutes. To create a deeper red, use more beets or boil them for longer.
Blueberries make a lovely pale blue dye when boiled. Simply add 1 cup of fresh or frozen blueberries to 4 cups of water and bring to a boil. Reduce the heat and let it simmer for about 10-15 minutes, then strain the mixture before using it as a dye.
When steeping these ingredients, you can achieve richer, more complex colors. For example, boiling turmeric in water will produce a bright yellow, while steeping it in vinegar creates a deeper, more muted shade. Experiment with different combinations and ratios to find your favorite natural dyes for Easter eggs.
Plant-Based Dyes: Flowers, Herbs, and Spices
When it comes to natural dyes for Easter eggs, flowers, herbs, and spices offer a wealth of creative possibilities. Indigo, for example, produces a range of blues from light sky tones to deep navy shades. To use indigo as a dye, you’ll need to steep the leaves in hot water until they release their color, then strain and mix with vinegar before applying it to your eggs.
Pomegranate rinds create a unique pink to coral hue, while cinnamon imparts a warm, golden tone. When using these dyes, keep in mind that the results may vary depending on factors like egg size, dye concentration, and temperature. To achieve consistent colors, experiment with different combinations of flowers, herbs, and spices.
Some plants produce more vibrant colors than others: for instance, marigold petals yield a brilliant yellow, while turmeric adds a bright orange tone. Consider using multiple dyes in combination to create intricate, multi-colored designs. When applying these natural dyes, be sure to wear gloves and work in a well-ventilated area to avoid skin irritation and minimize exposure to potential allergens.
Preparing Your Eggs for Dyeing
Before you start dyeing, let’s get your eggs ready for their natural color transformation by preparing them carefully and making sure they’re free of any residue. This will ensure vibrant, even results every time.
Cleaning and Whitening Eggs
To achieve vibrant and even natural dye results, it’s essential to start with clean eggs. Dirt, grime, and residue can affect the dye’s ability to penetrate the shell evenly, leading to uneven coloration or a dull finish. To ensure optimal results, give your eggs a thorough cleaning before dyeing.
Begin by washing the eggs in warm soapy water to remove any dirt or debris. Rinse them thoroughly with clean water to remove any soap residue. For extra whitening power, you can soak the eggs in a mixture of equal parts water and white vinegar for about 10-15 minutes. Alternatively, try baking soda: mix 1 tablespoon of baking soda with 1 cup of water to create a paste, then gently rub it onto the egg using a soft cloth or sponge. Rinse the egg thoroughly with clean water after soaking.
The key is to avoid using harsh chemicals that can damage the eggs or affect the natural dye’s performance. By keeping your eggs squeaky clean and using gentle whitening methods, you’ll set yourself up for success in achieving beautiful, naturally dyed Easter eggs.
Tips for Achieving Uniform Color
Achieving uniform color is essential for creating beautifully dyed eggs. To ensure consistent results, use eggs of similar sizes and shapes. This may seem obvious, but it’s surprising how much variation can occur between different batches or brands of eggs. Large eggs will generally absorb more dye than small ones, resulting in deeper colors.
When it comes to temperature, make sure the water is at a consistent heat for all dyeing sessions. A range of 180-200°F (82-93°C) is ideal for most natural dyes. Too high a temperature can cause the dye to break down and result in uneven absorption.
Egg shape also plays a role in dye absorption, with more irregular shapes allowing for greater surface area and thus more intense colors. However, if you’re aiming for a uniform color scheme, it’s best to stick with eggs of similar shapes.
To ensure consistency, use the same concentration of natural dye each time you dye eggs. Start with a small batch or test run to gauge the optimal amount of dye needed for your chosen ingredients and egg size. By paying attention to these factors, you’ll be well on your way to achieving uniform color in your naturally dyed Easter eggs.
Natural Dye Techniques and Methods
Let’s move on to exploring various natural dye techniques, from plant-based extracts to mineral-rich compounds, each offering unique results for your Easter eggs. You’ll learn how to harness their colors naturally.
Boiling Method: A Simple and Effective Approach
The boiling method is a straightforward way to dye eggs naturally. This approach involves boiling dyes and adding various ingredients to achieve unique color effects. To start, combine your chosen natural dye with water in a pot. The ratio of dye to water can vary depending on the desired intensity of the color. For example, if you’re using beets for a pink or red hue, use 2-3 beets per cup of water. Bring the mixture to a boil, then reduce the heat and let it simmer for about 10-15 minutes.
You can also add vinegar to the dye to help the colors adhere better to the eggshell. A tablespoon or two should suffice. If you want to create a marbled effect, try adding a few drops of oil to the dye. The oil will float on top of the water and create a swirly pattern as it meets the dye.
Some natural dyes work better with this method than others. Turmeric, for instance, tends to require longer simmering times to achieve its signature yellow color. Experiment with different combinations of ingredients and dyeing times to find what works best for you.
Steeping Method: Creating Rich, Deep Colors
The steeping method is a great way to create rich, deep colors on your natural Easter eggs without using too much dye. This technique involves soaking the eggs in a concentrated dye bath for an extended period, resulting in vibrant and long-lasting colors.
To get started with the steeping method, you’ll need to choose a strong natural dye like turmeric or coffee. Turmeric, for example, creates a beautiful golden yellow hue when steeped in hot water. Simply boil 1 cup of turmeric in 2 cups of water until it reaches your desired color intensity, then let the mixture cool before submerging the eggs.
Alternatively, you can use brewed coffee to create deep brown and black colors. Simply fill a jar with 2-3 tablespoons of coarse-ground coffee and cover it with boiling water. Let the mixture steep for several hours or overnight, then remove the coffee grounds and dye your eggs in the resulting liquid. The longer you steep the dye, the richer and deeper the color will be. This method is perfect for achieving those deep, rich colors without using excessive amounts of dye.
Safety Precautions and Troubleshooting
Before we start dyeing those eggs, let’s make sure you’re aware of some essential safety precautions to avoid any potential messes or mishaps in your natural Easter egg dyeing process. We’ll also cover common issues and troubleshooting tips.
Handling Natural Dyes Safely
When working with natural dyes, it’s essential to be aware of potential allergens and irritants. Turmeric, for instance, is a common dyeing agent known for its vibrant yellow color, but it can also cause skin irritation and staining in some individuals. Similarly, pomegranate and blueberry extracts may trigger allergic reactions in people with sensitive skin.
To handle natural dyes safely, start by wearing protective gloves and working in a well-ventilated area to minimize exposure to potential allergens. If you’re using powdered or granular dyes, mix them with water carefully, as they can be more concentrated than liquid extracts. When applying the dye mixture to eggs, use a brush or cloth to minimize direct contact.
Some natural dyes may stain surfaces or clothing, so take precautions by covering your work area and wearing old clothes. If you experience any skin irritation or allergic reactions during or after dyeing, wash the affected area thoroughly with soap and water, and seek medical attention if symptoms persist. By being mindful of these potential risks and taking simple precautions, you can enjoy a fun and creative natural egg-dyeing experience while minimizing the risk of adverse reactions.
Common Issues and Solutions
Uneven color distribution can be a frustrating issue when natural dyeing eggs. To address this, try adjusting the temperature of the dye bath. If the water is too hot, it can cause the colors to bleed unevenly, resulting in patchy or streaked patterns. Aim for a temperature between 180°F and 190°F (82°C to 88°C) for most natural dyes.
Over-dyeing occurs when the eggs are left in the dye bath for too long, resulting in overly saturated colors that may become muddy or brown. To avoid this, keep an eye on the eggs’ color progression and remove them from the dye bath as soon as you achieve your desired shade. Typically, 15-30 minutes is enough time for most natural dyes.
Under-dyeing can be caused by using too little dye or leaving the eggs in the dye bath for too short a time. To resolve this, try increasing the amount of dye used or extending the dyeing time to several hours. Be cautious not to over-saturate the eggs, as this can lead to messy clean-up.
Some natural dyes may require additional steps to achieve optimal color results. For example, turmeric-based dyes often benefit from an overnight steeping process to develop rich, deep colors.
Advanced Techniques: Creating Patterns and Designs
Now that you’ve mastered basic dyeing techniques, it’s time to get creative and learn how to create unique patterns and designs on your Easter eggs. We’ll cover advanced methods using natural materials like leaves, flowers, and spices.
Using Natural Dyes in Combination
When working with multiple natural dyes, you can create unique patterns and designs by combining them in different ways. One technique is layering colors: start with a light-colored dye, such as turmeric or coffee, to set the base tone of the egg. Then, while the eggs are still warm from the first dye bath, submerge them in a second dye mixture with a darker color.
For example, you could layer blueberry juice over yellow onion skins for a soft pastel effect. Alternatively, try using stencils or masking tape to create intricate designs on your eggs. You can apply these stencils before or after the first dye bath, depending on the design’s complexity and the colors involved.
When combining dyes, keep in mind that some natural colorants may interact with each other, resulting in unexpected hues or faded colors. To minimize this risk, start with small batches of eggs to test the combination of dyes you’re using. This will allow you to gauge how well the colors work together and adjust your technique accordingly.
To achieve detailed, multi-colored designs, consider using stencils with different shapes and sizes to create a composition on each egg. Experiment with layering colors in different ways to develop your own unique techniques and styles.
Tips for Achieving Detailed, Multi-Colored Designs
To achieve intricate, multi-colored designs, experiment with combining different natural dyes and application methods. One approach is to use a base color created by boiling or steeping a dye, then add additional colors using a milder steeping method. For instance, you can start with a deep blue from boiled indigo berries, followed by gentle steeps of turmeric or pomegranate juice for subtle yellow and orange hues.
Alternatively, try layering different dyes to create a multi-colored effect. Begin by dyeing an egg in one color, then wrap it in cloth soaked in another dye before letting it sit for a short time. The resulting design will show the underlying base color through the overlying layer. This technique works particularly well with plant-based dyes like beets and coffee.
When working with multiple colors, consider using a few key combinations to achieve a cohesive look. For example, pairing soft pinks and blues can create a whimsical Easter feel, while bold reds and yellows evoke a more vibrant springtime atmosphere.
Conclusion: Embracing the Beauty of Natural Dyeing
Now that you’ve mastered natural Easter egg dyeing techniques, let’s take a moment to appreciate the beauty and simplicity of this process.
Reflecting on the Experience
Reflecting on the experience of natural dyeing can be a transformative and creative journey. As you step back to admire your beautifully colored eggs, take a moment to appreciate the process itself – not just the end result. The act of using natural materials to create vibrant hues is a testament to nature’s beauty and potential for artistic expression.
Notice how the imperfections and uniqueness of each egg add character to its coloration, making it truly one-of-a-kind. This is a reflection of the organic, non-repetitive nature of natural dyeing. Unlike commercial dyes, which can produce uniform but predictable results, natural dyes offer an element of surprise.
As you experiment with different combinations and techniques, remember that mistakes are opportunities for discovery. Don’t be afraid to try new things – it’s in these moments that you may stumble upon something entirely new and unexpected. By embracing the process and letting go of perfectionism, you’ll unlock a world of creative possibilities. Take time to document your journey, whether through photos or notes, to inspire future projects and refine your skills.
Inspiration for Future Projects
As you’ve experimented with natural dyeing techniques on your Easter eggs, you may be wondering about other creative applications of these colors. Natural dyes can add a unique and beautiful touch to various projects beyond egg decorating. For instance, consider using natural dyes for paper crafting, where you can create one-of-a-kind cards, gift wrap, or even art pieces.
You can also explore the use of natural dyes in textile design. Many artists and designers incorporate plant-based colors into their fabric creations, resulting in stunning, eco-friendly fashion statements. To get started with this technique, research different plants that produce vibrant colors, such as indigo for a deep blue hue or madder for a range of red shades.
Another exciting area to explore is natural dyeing for candle-making and soap creation. These products can become truly special when infused with the subtle tones and hues produced by plant-based dyes. This unique approach not only adds an artistic touch but also celebrates sustainability in crafting.
Frequently Asked Questions
Can I reuse natural dye solutions for future egg-dyeing projects?
Yes, natural dye solutions can be reused multiple times by simply reheating and reusing the same solution. This is especially beneficial if you’re working with expensive or hard-to-find ingredients like indigo. To maintain color consistency, make sure to stir well before each use.
What happens if I accidentally mix two natural dyes that don’t complement each other?
If you’ve mixed two natural dyes that clash, the resulting color might be unappealing. To recover, try adding a small amount of white vinegar or baking soda to neutralize the mixture and create a new base for subsequent dye applications.
How do I know when my eggs are fully saturated with the natural dye?
To check if your eggs have reached full saturation, gently hold one egg against a light source and observe its color. If it still appears pale or unevenly colored, continue steeping or boiling until you achieve the desired hue.
Can I use natural dyes for other objects besides Easter eggs, like paper or fabric?
Yes, many natural dyes can be used on various materials beyond eggs. When experimenting with new surfaces, keep in mind that different materials may require adjustments to dye concentrations and application times. Research specific guidelines for your chosen material before proceeding.
How do I store my naturally dyed eggs to maintain their color intensity over time?
To preserve the vibrant colors of your natural dyes, store your eggs in a cool, dry place away from direct sunlight. You can also consider applying a clear varnish or sealant to protect the dye and prevent fading.
What if I encounter issues with uneven color distribution or mottling during the dyeing process?
If you notice uneven color patterns or mottling, try adjusting your dye concentration or steeping time. For more severe cases, experiment with different natural dye combinations or techniques like layering colors to achieve a desired effect.

