
Drawing a realistic rose plant can be a challenging task, especially for beginners. But with practice and patience, you can master the skills to create stunning artworks that capture the beauty of nature. A well-drawn rose plant requires attention to detail in its anatomy, from the delicate petals to the sturdy stem and roots. To achieve this level of realism, it’s essential to understand the underlying structure and use reference images to guide your drawing process.
This step-by-step guide will walk you through the process of drawing a realistic rose plant, covering tools, shading techniques, and providing valuable tips on how to capture its intricate details. By following our guide, you’ll be able to create your own stunning artworks that showcase the beauty of this iconic flower.
Understanding Rose Anatomy
To draw a realistic rose plant, it’s essential to understand the structure and composition of its individual parts, including the stem, leaves, and of course, the flower itself. Let’s start by breaking down these key components.
Identifying Key Features
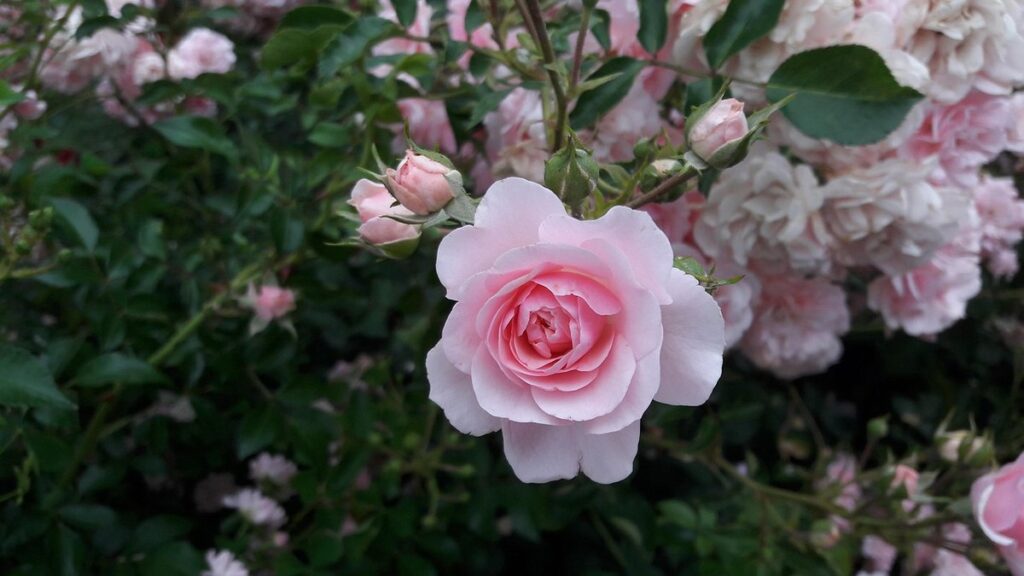
When drawing a rose plant, it’s essential to identify its key features. Start by examining the overall shape and structure of the plant. Notice how the stems emerge from the base, some of which may be thicker and more prominent than others. These are typically the main stems that support the weight of the flowers.
Look for the placement of leaves along these stems. Rose leaves are usually long and narrow, with pointed tips and a serrated edge. They tend to grow in pairs, opposite each other on the stem. Note how they vary in size and shape, with some being smaller and more delicate than others.
Flowers, of course, are the most prominent feature of a rose plant. Identify their placement along the stems and branches, paying attention to the number of petals and their arrangement. Some roses have many small, delicate petals, while others have fewer but larger ones. Observe how the flowers face – do they point upwards or downwards? This will help you determine the overall direction of the stem.
When drawing these features, try to capture their subtle variations in size, shape, and placement. This will add depth and realism to your rose plant.
Leaf Structure and Placement
When drawing a rose plant, accurately depicting its leaves is crucial for creating a lifelike representation. Leaves come in different shapes and sizes depending on their location on the stem. The largest leaves are typically located at the base of the plant, near the soil line, while smaller ones are found towards the top.
The shape of rose leaves can be described as ovate or lance-shaped with a pointed tip and a rounded base. They have a wavy or serrated edge, which gives them a distinctive texture. The veins on rose leaves are prominent and run parallel to each other, often forming a network that adds depth to the leaf’s surface.
When placing leaves on your drawing, remember that they alternate along the stem in an opposite pattern, meaning that one leaf is positioned on either side of a node (the joint where a leaf meets the stem). Typically, there are 3-5 sets of leaves for every set of flowers. You can use this ratio as a guideline to ensure a balanced and natural-looking arrangement.
Stem and Thorn Details
A rose plant’s stem is typically thicker at the base and tapers towards the top. The texture of a stem can vary depending on the type of rose; some have smooth, hairless stems, while others may be slightly fuzzy or have small hairs. In most cases, the stem is green in color, but it can also be reddish-purple, especially when it’s new growth.
Thorns are a distinctive feature of many rose plants, and they’re usually found along the length of the stem. The number and arrangement of thorns vary between species; some have only a few scattered thorns, while others have dense clusters. Thorns can be sharp or blunt, and their shape can range from straight to curved.
When drawing a rose plant’s stem, consider the size and placement of thorns. Start by lightly sketching the general shape of the stem, including the location of any prominent features like nodes (where leaves meet the stem). Then, add the thorns, working from the base up and using gentle, smooth lines to suggest their texture.
Gathering Reference Images
To draw a convincing rose plant, you’ll want to gather some high-quality reference images that showcase the flowers’ delicate petals and sturdy stems. Collect photos of roses from different angles to study their texture and shape.
Collecting Real-Life References
When collecting real-life references for drawing roses, it’s essential to start with high-quality photos. Visit online resources like botanical gardens’ websites, gardening forums, or social media platforms dedicated to rose enthusiasts. These sources often feature detailed images of various rose varieties in different stages of growth. You can also search for stock photo websites that specialize in botanical and floral content.
When selecting reference images, pay attention to the lighting conditions, as they can greatly impact the overall appearance of your drawing. Natural light is always the best option, but if you’re working with artificial light sources, try to replicate the soft, gentle glow of sunlight. Look for images with minimal clutter or distractions in the background, allowing the rose plant to be the main focus.
It’s also beneficial to collect reference images from different angles and perspectives, such as close-ups of individual blooms, shots of the entire plant, or detailed views of leaf and stem textures. By gathering a variety of high-quality references, you’ll have a better understanding of the intricate details that make each rose unique.
Understanding Rose Varieties
Roses come in an incredible array of varieties, each with its own distinct characteristics. For drawing purposes, it’s essential to understand these differences and how they can be used as references. Some popular types of rose plants include Hybrid Tea roses, Floribunda roses, Climbing roses, Ramblers, and Miniature roses.
Hybrid Tea roses are known for their large, repeat-flowering blooms and slender stems. Their flowers are typically symmetrical and cupped in shape, making them a great reference for drawing larger, more formal rose varieties. Floribunda roses, on the other hand, have clusters of smaller blooms and slightly shorter stems. These characteristics make them ideal for drawing informal or wild rose arrangements.
When using these types as references, consider studying their overall plant structure, including the height and spread of the canes, as well as the leaf arrangement and foliage density. Pay attention to how the flowers are arranged on the stem, and take note of any unique features like thorns or growth habits. By observing and noting these characteristics, you’ll be able to draw a more accurate and detailed representation of your chosen rose variety.
Preparing Your Drawing Tools
Before you start drawing, make sure your pencils and eraser are sharpened and ready to go – a good foundation is key to creating a beautiful rose plant. Gather all your necessary tools within easy reach.
Choosing the Right Paper
When choosing the right paper for drawing roses, several factors come into play. The texture of the paper is crucial as it affects how your lines and details appear on the page. A smooth paper will allow you to create delicate petals and fine stems with ease, while a textured paper can add depth and visual interest to your work.
In terms of size, consider the scale at which you plan to draw the rose plant. A larger sheet of paper allows for more detail and intricate designs, whereas smaller sheets are better suited for quick sketches or loose studies. Most drawing papers come in standard sizes such as A4, A3, or 11×17 inches.
Some popular options for drawing roses include hot press watercolor paper and smooth cartridge paper. Hot press paper is ideal for delicate work as it produces a smooth finish without any texture. Smooth cartridge paper, on the other hand, offers a versatile surface that can handle both dry media like pencils and charcoal, as well as wet media like ink or paint.
When selecting a paper, make sure to read the specifications carefully. Look for papers with a high rag content, which indicates durability and long-lasting quality. A heavier weight paper will also resist buckling under repeated layers of drawing or painting.
Selecting Drawing Instruments
When selecting drawing instruments for a realistic rose plant, it’s essential to choose tools that can produce a range of values and textures. A set of graphite pencils with varying hardness levels (HB, 2B, 4B, 6B) will allow you to create smooth transitions from light to dark areas. The HB pencil is versatile for initial sketches and basic shading, while the softer pencils (2B, 4B, 6B) are better suited for creating deeper shadows and details.
A good eraser is also crucial for correcting mistakes and erasing unwanted lines. A kneaded eraser is ideal for delicate work, as it can be shaped to fit small areas without damaging the paper. For larger corrections, a white vinegar eraser or a regular eraser will suffice.
In addition to pencils and erasers, a sharpener is necessary for maintaining a steady edge on your graphite leads. Look for a sharpener with adjustable settings to accommodate different pencil hardness levels. A dedicated sharpening tool, such as a desktop sharpener or a manual sharpener, can help you achieve precise points without waste.
For additional texture and detail, consider using colored pencils or a fine-tip marker. These tools are perfect for adding subtle color gradations or delicate details like thorns and veins.
Basic Rose Shape and Form
Let’s start by mastering the basic rose shape, which consists of a central core surrounded by curved petals that taper to a point. Understanding this fundamental form is essential for creating realistic roses.
Sketching the Basic Shape
To sketch the basic shape of the rose plant, start by lightly drawing its overall proportions. Begin with a vertical line to represent the trunk, which should be slightly thicker at the base and tapering towards the top. From the trunk, draw two main branches that curve outwards, roughly one-third of the way down from the top. These branches will form the framework for your rose bush.
Next, lightly sketch in the leaf structure. Rose leaves are typically long and narrow, with a pointed tip and a serrated edge. Draw five to seven leaves on each branch, spacing them about an inch apart. Pay attention to their orientation: they should be angled slightly upwards towards the tips of the branches.
As you draw the basic shape, keep in mind that it’s better to start with simple lines and gradually add details rather than trying to create intricate features from the outset. Use a soft pencil or a range of light strokes to block out the overall form, allowing you to build upon this foundation as you progress through your drawing.
Adding Form and Texture
To add form and texture to your rose plant drawing, start by considering the volume of each petal. Petals at the base of the flower tend to be thicker and more rounded than those towards the center. Use gentle, flowing lines to suggest the curves of each petal, gradually decreasing in size as you move inward. You can also use subtle shading to indicate where petals are layered on top of one another.
Next, think about the texture of individual petals. Some rose varieties have smooth, waxy petals, while others may be more velvety or ruffled. To capture this texture, try using short, delicate strokes for smoother areas and longer, more expressive strokes for more textured regions. Pay particular attention to the edges of petals, where they overlap or curve around each other.
When adding form and texture, remember that a rose plant is not just a single flower – it’s also the leaves, stems, and thorns that surround it. Use loose, gestural lines to suggest the curves of larger leaves and the wispy tendrils of smaller ones. You can also add subtle shading to indicate where light catches the leaf edges or creates shadows between them.
Refining Details and Shading
Now that you have a solid foundation for your rose plant drawing, let’s add depth and dimension by refining the details and shading. Focus on subtle variations in texture and value to create a visually appealing piece.
Drawing Individual Leaves and Flowers
When drawing individual leaves and flowers, it’s essential to capture their unique characteristics. Start by studying reference images of rose plants, paying attention to leaf shape, size, and arrangement on the stem. Leaves are typically elliptical or oval-shaped with pointed tips and smooth edges. They come in various sizes, but those closest to the stem tend to be smaller than those further down.
The leaves’ veins should be subtly visible, especially near the base of the leaf. You can achieve this by using gentle hatching strokes that follow the direction of the veins. As for flowers, each petal is typically teardrop-shaped with a rounded tip and smooth edges. Petals on inner flowers are often larger than those on outer flowers.
When drawing individual flowers, pay attention to their orientation and arrangement within the overall rose cluster. Inner flowers tend to face inward, while outer ones face outward. The number of petals can vary depending on the rose variety, but most roses have five or more petals per flower. To capture the delicate texture of petals, use soft, gentle strokes that follow the curve of each petal.
Mastering Shading Techniques
To create depth and dimension in your rose drawing, you’ll need to master various shading techniques. Start with simple hatching: gently layering parallel lines across the petals, leaves, and stem. This will help establish volume and texture. Experiment with different line weights by varying the pressure on your pencil – lighter lines can suggest softness, while heavier ones create deeper shadows.
Next, try cross-hatching to add more depth and complexity. Layer perpendicular lines over hatching strokes to create a sense of dimensionality. Be cautious not to overdo it: too many layers can make your drawing look busy or messy. To avoid this, focus on subtle variations in line weight and texture.
For more advanced shading, try stippling – creating detailed patterns with small dots. This technique is particularly effective for capturing the intricate details of rose petals. Use a fine-tip pen or pencil to create precise, evenly spaced dots that blend together to form soft, rounded shapes.
When working with stippling, remember to vary your dot size and spacing to achieve a sense of volume and texture. For example, smaller dots can suggest smooth, curved surfaces, while larger ones create more pronounced folds and creases.
Advanced Techniques for Realism
To take your rose plant drawing to a whole new level, let’s explore advanced techniques for creating realistic details and textures that bring life to your artwork. This includes subtle shading and layering.
Capturing Light and Shadow
When capturing light and shadow on your rose plant drawing, remember that these effects are not just about adding darkness to areas of the plant. They’re also about conveying texture, depth, and the way light interacts with delicate petals and leaves. To achieve this, start by observing how the light source affects different parts of the plant.
Notice how some areas are in full sunlight, while others are shaded or partially lit. This creates a gradient effect that can be replicated using gentle hatching and cross-hatching techniques. Use softer lines for lightly shaded areas and gradually increase line weight as you move towards darker shadows. Pay attention to where light catches the edges of petals and leaves, creating subtle highlights.
When shading, consider the texture of individual rose parts, such as the thorns on stems or the velvety softness of flower centers. To capture these textures accurately, use short, gentle strokes that follow the contours of the plant’s surface. Keep in mind that light can also create interesting effects by casting shadows within the plant’s leaves and flowers themselves – don’t be afraid to experiment with this to add depth and visual interest to your drawing.
Achieving Soft Petals and Delicate Details
To achieve soft petals and delicate details, consider the texture and structure of individual rose components. When drawing individual flowers, focus on creating layers of petal shapes rather than trying to render a single, uniform bloom. This helps capture the subtle variation in petal size, curvature, and overlap that gives roses their characteristic softness.
To create realistic petals, use gentle curves and subtle transitions between edges. Avoid hard lines or sharp angles, which can make petals appear stiff or artificial. Instead, opt for smooth, flowing connections between shapes. For delicate details like stamens or the rose’s central cluster, employ fine lines and precise strokes to suggest texture without overpowering the surrounding forms.
Pay attention to petal placement as well – individual blooms often overlap slightly, creating a soft, layered effect. Experiment with varying the size and orientation of petals within a single bloom to achieve a more natural appearance. By focusing on these subtle details, you can imbue your rose plant drawing with a greater sense of realism and visual appeal.
Frequently Asked Questions
How to Draw a Realistic Rose in Different Angles and Perspectives
When drawing a rose plant from different angles or perspectives, it can be challenging to maintain accuracy. To achieve this, focus on breaking down the subject into smaller components, such as leaves, stems, and flowers, and then reassemble them in the desired perspective. Study reference images of roses from various angles to understand how light and shadow affect the overall shape and form.
What if My Rose Drawing Looks Too Simplified or Lacking in Details?
If your rose drawing appears too simplified or lacking in details, it’s likely due to an imbalance between the basic shapes and the individual components. To address this, focus on adding more texture and detail to the leaves, stems, and flowers, while maintaining a clear understanding of the overall shape and form. Practice drawing individual elements multiple times to refine your skills.
Can I Use Digital Tools for Drawing Roses, or Should I Stick with Traditional Media?
Both traditional and digital tools can be effective for drawing roses. When using digital media, focus on capturing the essence of the rose plant rather than trying to replicate every detail. Consider using a combination of soft brushes and layering techniques to achieve realistic textures and shading effects.
How Do I Achieve Soft Petals and Delicate Details in My Rose Drawing?
To draw soft petals and delicate details, use gentle lines and soft hatching or stippling techniques. Study the texture and structure of real rose petals to capture their intricate patterns and shapes. Practice drawing individual petals multiple times to refine your skills.
What if I’m Having Trouble Capturing Realistic Light and Shadow Effects in My Rose Drawing?
Capturing realistic light and shadow effects can be challenging, especially when working with traditional media. To achieve more accurate results, focus on studying reference images of roses in various lighting conditions and practice drawing the interplay between light and shadow. Experiment with different shading techniques, such as hatching or cross-hatching, to capture subtle nuances in texture and form.

