
Sketching shading can be intimidating, especially when you’re just starting out. You may find yourself struggling to convey depth and dimension on paper, unsure of where to begin with techniques like hatching or cross-hatching. However, mastering these fundamental skills is essential for taking your sketches from flat, two-dimensional representations to rich, three-dimensional works of art. Shading is more than just a technique – it’s an opportunity to create atmosphere and mood in your drawings, guiding the viewer’s eye through the composition. In this comprehensive guide, we’ll cover the basics of shading, including hatching and cross-hatching, as well as more advanced techniques like atmospheric perspective, which will help you add depth and volume to your sketches. By the end of this article, you’ll have a solid understanding of how to use shading to take your sketching skills to the next level.
Understanding the Basics of Shading
To create a beautiful sketch, you need to understand how shading works, starting with the fundamental principles of light and shadow interaction. Let’s begin by exploring these essential concepts together.
What is Shading in Sketching?
Shading is a fundamental technique used to create depth and volume in drawings. It’s what sets a flat, two-dimensional representation apart from a lifelike, three-dimensional one. When done correctly, shading can make an object appear as if it’s about to leap off the page.
To achieve this effect, artists use various lines, shapes, and values. Values refer to the lightness or darkness of a particular area on the paper. Understanding how to control these values is crucial in creating convincing shading. You can begin by observing how light interacts with different textures and surfaces – for instance, how it scatters off smooth skin versus how it casts deep shadows in crevices.
In practice, this means using hatching lines of varying thickness and density to convey the way light falls on an object. Stippling, another technique used in shading, involves creating detailed textures by building up small dots of color. By combining these methods with a good understanding of value, you can create rich, dimensional drawings that invite the viewer to explore every detail.
Types of Shading Techniques
Shading techniques come in various forms, each with its unique characteristics and applications. Hatching is a fundamental technique where lines follow the contours of an object to create a range of values. It can be used for both subtle and dramatic effects, making it versatile for various subjects.
Cross-hatching involves layering hatching lines at different angles to achieve deeper, more textured values. This technique is particularly effective in creating detailed, realistic drawings with high contrast. Stippling, on the other hand, uses small dots to create a wide range of tonal values. By adjusting the density and spacing of these dots, artists can achieve intricate textures and subtle nuances.
Atmospheric perspective is a technique used to convey distance and depth by manipulating shading. Objects in the background appear lighter and less detailed than those in the foreground. This creates a sense of layering and atmosphere, making it ideal for landscapes and cityscapes. Understanding these different techniques allows artists to experiment with various styles and effects, expanding their creative possibilities.
Mastering the Fundamentals of Value
Mastering value requires a deep understanding of light and shadow, as well as the subtle gradations between them. Let’s explore how to create convincing shading that sets your sketches apart from the rest.
Introduction to Value and Light Sources
When sketching shading, understanding how light sources interact with objects is essential for creating realistic shades. Light sources can be categorized into two main types: direct and indirect. Direct light sources emit light directly onto an object, such as the sun shining on a face. Indirect light sources, like ambient light or reflected light, bounce off other surfaces before reaching the object.
To create form and volume, you need to consider how different light sources affect your subject. For example, direct sunlight can create deep shadows and emphasize texture, while indirect light can soften features and create a sense of depth. When sketching an object with multiple light sources, observe how they interact with each other to produce complex shading effects.
As you begin to explore value in your sketches, pay attention to the way light sources interact with different materials and textures. Notice how metal reflects light, creating bright highlights, while fabric absorbs it, producing soft shadows. By understanding these basic principles, you’ll be better equipped to capture the nuanced interactions between light and matter, resulting in more realistic and engaging shading in your sketches.
Creating a Value Scale
When creating a value scale for sketching shading, it’s essential to consider the specific lighting conditions and subject matter. Start by observing the range of values present in your subject – from the darkest shadows to the brightest highlights. You can use a piece of paper or a digital tool to create a rough representation of this value range.
Begin by dividing a strip of paper into 10-12 equal sections, using a pencil to lightly draw each boundary. Then, label each section with a corresponding value (e.g., 1 for the darkest area, 10 for the lightest). You can also use different shades of gray or colored pencils to create a more nuanced scale.
For example, if you’re sketching a still-life setup with deep shadows and bright highlights, your value scale might range from 1-5 (very dark) to 8-10 (very light). This custom scale will help you accurately capture the range of values in your subject. Keep in mind that it’s not necessary to create an exhaustive list of every possible value – focus on capturing the most significant transitions between light and dark.
Shading Techniques for Beginners
Mastering shading techniques is essential to creating depth and dimension in your sketches, so let’s start with the basics of value and contrast. You’ll learn how to create a range of values using simple strokes and shapes.
Hatching: A Beginner-Friendly Technique
When practicing hatching, start by observing how different lines can achieve varying degrees of darkness. A smooth transition between values is created when lines are evenly spaced and follow a consistent direction. To develop muscle memory and control over the pencil, begin with simple exercises like drawing parallel lines or hatching across a sheet of paper.
As you become more comfortable with the technique, experiment with different line weights and spacings to achieve unique textures and shading effects. For example, closely spaced lines can create deep shadows, while wider-spaced lines produce softer transitions between values.
To master the basics of hatching, follow these steps:
- Choose a subject with simple forms, such as a sphere or cylinder.
- Determine the direction of the light source and apply it consistently throughout your drawing.
- Start with short, gentle strokes to establish the basic shape and value structure.
- Gradually build up layers of hatching lines to create depth and dimension.
Remember, practice is key when developing muscle memory and control over the pencil. Regularly practicing hatching exercises will help you achieve smooth transitions between values and master this fundamental shading technique.
Stippling: Creating Texture with Small Marks
Stippling is a unique shading technique that involves creating images using small dots. This method is particularly well-suited for capturing detailed textures and patterns, making it an excellent choice for artists who want to add depth and realism to their sketches.
To create stippled textures, start by selecting a range of dot sizes, from fine to coarse. Experiment with different combinations to achieve the desired effect. For instance, using smaller dots can produce smooth, subtle textures, while larger dots can create more expressive, rougher surfaces.
When applying stippling to your sketch, focus on building up layers of small marks. Begin by creating a series of closely spaced dots that follow the contours of the subject. Then, gradually add more dots, varying their density and spacing to capture nuanced details and patterns.
A key advantage of stippling is its ability to convey intricate textures without becoming overly detailed or busy. By carefully controlling dot size and placement, you can achieve a range of effects, from soft, atmospheric surfaces to crisp, high-contrast details.
Advanced Shading Techniques
Now that you’ve mastered the basics of shading, it’s time to take your skills to the next level by exploring more complex techniques and strategies for creating depth and dimension. We’ll delve into advanced methods.
Cross-Hatching: Adding Depth and Dimension
To add depth and dimension to your sketches, cross-hatching is an essential technique to master. Building upon basic hatching, cross-hatching involves layering lines at different angles to create a more complex value structure. This allows for the capture of intricate details, making it ideal for subjects with textured or nuanced surfaces.
When applying cross-hatching, start by establishing a base layer of hatching that sets the overall tone and values. Then, introduce additional layers of lines that intersect the previous ones at varying angles – typically between 30 to 60 degrees. This will create a richer value structure and add depth to your sketch.
To achieve this effectively, focus on varying line weights and textures as you layer them. Thicker lines can be used for background or atmospheric elements, while finer lines are better suited for capturing fine details. Experiment with different line orientations and densities to achieve the desired level of contrast and dimensionality in your work.
Atmospheric Perspective: Capturing Distance and Scale
When rendering atmospheric perspective in your sketches, the goal is to convey distance and scale through subtle gradations of value. This technique relies on the way light interacts with atmosphere, causing objects at a distance to appear hazy or faded. To capture this effect, artists often use soft, gentle marks that blend into one another.
One effective approach is to start by blocking in the overall shape and volume of the scene, using larger strokes for areas closer to the viewer. As you work your way back, gradually reduce the size and density of your marks to suggest increasing distance. This not only creates a sense of depth but also helps maintain a clear visual hierarchy.
In practice, atmospheric perspective is often achieved by combining subtle value shifts with soft-edged hatching or stippling. For example, if drawing a landscape, you might use gentle hatching to suggest the distant mountains, gradually fading into the background as they recede from view. By mastering this technique, you can imbue your sketches with a sense of space and atmosphere that draws the viewer’s eye into the scene.
Applying Shading Techniques to Different Subjects
Now that you’ve mastered basic shading techniques, let’s apply them to various subjects and explore how to capture subtle nuances and textures in your sketches.
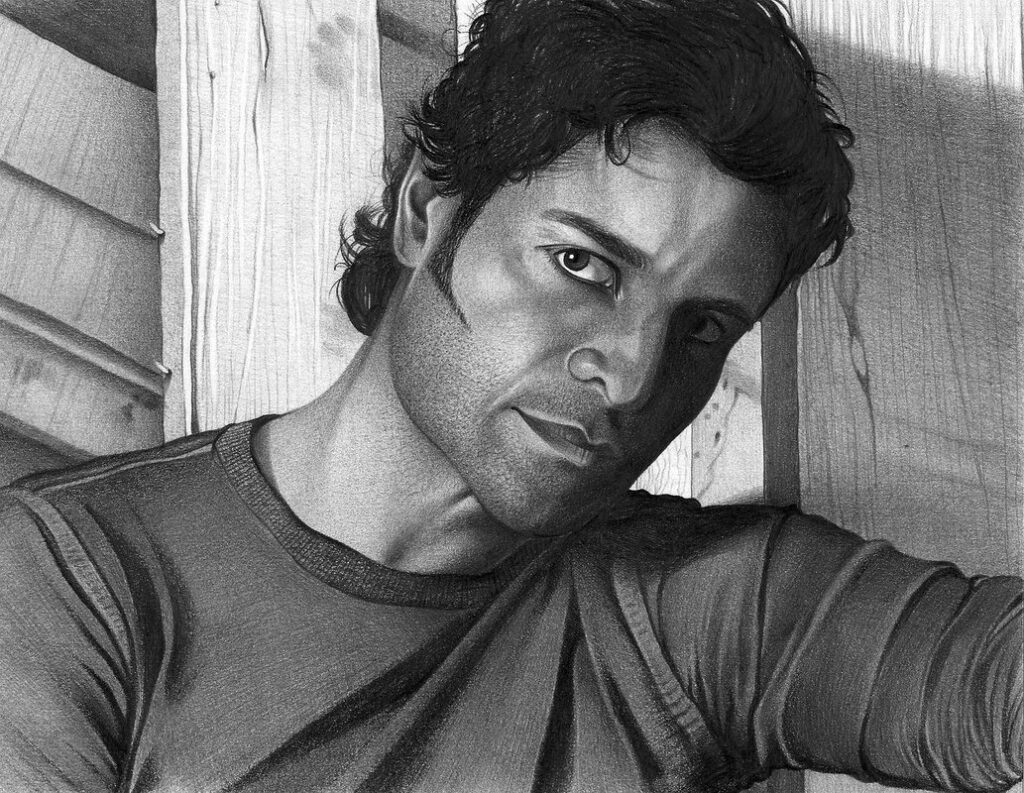
Sketching Portraits with Realistic Shading
When shading portraits, it’s essential to capture the subtleties of human expression and form. To achieve realistic shading, start by studying the subject’s face, paying attention to areas where light naturally falls. The nose, forehead, and chin are typically the brightest spots, while the eyes, mouth, and shadows are often darker.
To create a sense of volume and depth, use a range of values from very dark to very light. For example, use a soft pencil or charcoal to block in the overall shape of the face, then gradually build up layers of shading with darker values for areas like the eyes and nose. Use hatching techniques to suggest texture and muscle definition, such as on the cheeks or forehead.
In portraits, it’s also crucial to capture the subtleties of skin tone and hair texture. To achieve this, use a range of pencils or charcoal shades to create a nuanced value scale. For example, use a 2B pencil for dark areas like eye sockets, then gradually build up to softer pencils (4H, HB) for lighter areas like the forehead or nose. Remember that realistic shading in portraits is about capturing subtlety and nuance, rather than dramatic highlights or deep shadows.
Capturing Form and Texture in Still-Life Drawings
When rendering still-life drawings, capturing form and texture through shading is crucial for creating a visually appealing piece. To achieve this, start by studying the objects’ contours and shapes. Notice how light falls on edges, curves, and sharp corners – these areas will help you establish the overall value structure of your drawing.
Pay attention to the way textures interact with light: smooth surfaces tend to reflect light more evenly, while rough textures absorb it. Use this observation to create a subtle contrast between different textures in your still-life composition. For instance, if you’re drawing a vase with intricate patterns and a nearby book with a matte finish, use hatching or cross-hatching to suggest the book’s texture and stippling for the vase’s.
Consider dividing your still life into areas of similar value or texture. This will help you maintain a cohesive look and avoid visual clutter. For example, if you’re drawing a collection of objects on a tablecloth with a complex pattern, focus on capturing the overall tone and texture of the cloth first, then build up the rest of the composition around it.
When working with multiple textures and forms in a still life, remember to balance light and dark areas carefully. This will help create depth and visual interest in your drawing.
Tips for Improving Your Shading Skills
Developing strong shading skills takes practice and patience, but with the right techniques and mindset, you can take your sketches to the next level quickly. Mastering these tips will transform your artistic abilities in no time.
Practice Regularly and Experiment with Different Techniques
Regular practice is essential for mastering sketching shading. Set aside time each day or week to work on shading exercises, and challenge yourself with increasingly complex subjects. Start by experimenting with different hatching styles – try varying the thickness of your lines, the direction of your strokes, and the pressure you apply to your pencil.
Experimenting with different materials can also help keep your practice sessions engaging. Try using charcoal, ink, or even digital drawing tools to create unique textures and effects. For example, using a range of pencils with varying hardness levels can add depth and dimension to your drawings. You might find that certain techniques work better with specific materials, so don’t be afraid to explore different combinations.
When trying new techniques, it’s also helpful to study the work of other artists for inspiration and guidance. Look at how they use shading to create mood, atmosphere, and a sense of depth in their drawings. Take note of what you like about their style and try to incorporate those elements into your own practice. Remember that mastery takes time, so be patient and persistent – with consistent effort and experimentation, you’ll see significant improvements in your sketching skills.
Study the Work of Other Artists and Learn from Their Techniques
When studying the work of other artists, pay close attention to how they use different shading techniques to achieve specific effects. Observe how they break up large areas into smaller sections, using hatching, cross-hatching, and stippling to create texture and depth. Note how they handle transitions between values, gradating from light to dark with smooth curves or sharp lines.
Examine the work of artists who specialize in shading, such as Rembrandt or Vermeer. Study their use of chiaroscuro, which creates a sense of volume by contrasting strong highlights with deep shadows. Look at how they apply this technique to different subjects, from portraits to landscapes.
As you study other artists’ work, take note of the specific techniques and tools they use. Are they employing traditional media like pencils or charcoal, or modern digital tools? What are their favorite brushes or pens? By understanding what works for others, you can adapt these techniques to your own style and preferences.
Look at multiple examples from different artists to identify common patterns and approaches. You might find that certain techniques work better for specific subjects or styles. Pay attention to how artists vary their shading techniques to convey mood, atmosphere, and emotion. By studying the work of others, you’ll gain a deeper understanding of the creative process and develop your own unique voice in sketching shading.
Conclusion
In conclusion, mastering the art of sketching shading requires patience, practice, and persistence. As you’ve worked through this comprehensive guide, you’ve learned how to create a range of shading effects using different techniques, tools, and mediums. From basic hatching to advanced gradient mapping, you now have the skills to bring depth and dimension to your sketches. Remember that shading is not just about creating shadows; it’s also about capturing light and atmosphere.
To reinforce your newfound skills, regularly practice sketching from life or still-life setups. Observe how different lighting conditions affect the shapes and forms of objects. Experiment with various materials and tools, such as charcoal, pencils, and markers, to discover their unique characteristics and effects. Finally, don’t be afraid to experiment and try new things – shading is an art that requires creativity and imagination.
Frequently Asked Questions
Can I use shading techniques to create abstract art?
Yes. Shading techniques can be used to create expressive and dynamic abstract artworks by emphasizing value, texture, and gesture. Experiment with different techniques like hatching, cross-hatching, or stippling to achieve unique effects.
How do I know when a piece is finished and ready for display?
A sketch is complete when the artist feels that it accurately conveys their intended mood, message, or subject. Consider taking breaks from your work and revisiting it with fresh eyes to ensure that you’ve captured the essence of the scene. Practice regularly to develop your judgment.
What’s the best way to incorporate shading into my daily sketching routine?
Incorporate shading techniques gradually by starting with simple exercises like hatching or stippling. Gradually move on to more complex techniques like cross-hatching and atmospheric perspective as you build confidence and skill. Experiment with different materials and styles to keep your practice sessions engaging.
Can I use digital tools to create shading effects, or do I need traditional media?
Yes. Digital drawing software can be used to achieve realistic shading effects using various brushes, layers, and blending modes. Familiarize yourself with the capabilities of your chosen tool to unlock new possibilities for creating dynamic sketches.

