
Turning food scraps and yard waste into nutrient-rich soil for your garden can be as simple as creating a DIY compost container. You probably know that buying bags of compost or potting mix can be expensive, but making your own can not only save you money but also reduce your household’s environmental impact. A well-designed compost container is the key to successful backyard composting. But where do you start? Choosing the right materials and designing a functional space are crucial steps in creating an effective DIY compost container for your home garden. In this comprehensive guide, we’ll cover everything from selecting the perfect location and choosing durable materials to tips on how to maintain optimal conditions for decomposition. By the end of this article, you’ll be able to create your own eco-friendly compost container that will help your plants thrive while minimizing waste in your household.
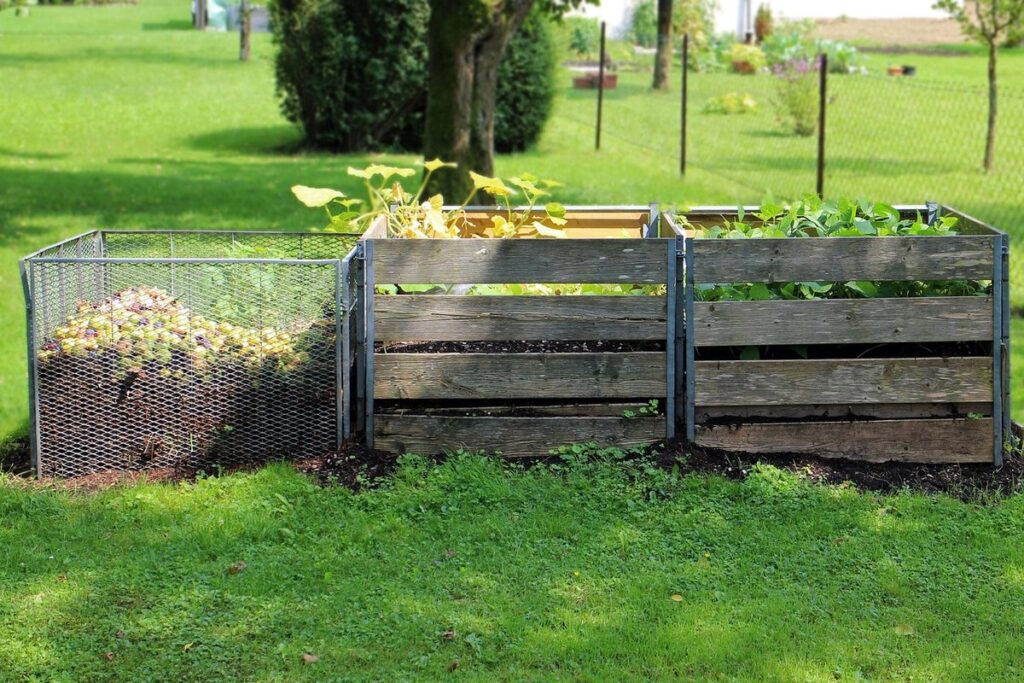
Choosing the Right Location
When it comes to building a successful DIY compost container, selecting a suitable location is crucial for optimal performance and minimal mess. Choose a spot that receives good airflow and is easily accessible for maintenance.
Identifying a Sunny Spot
To identify a sunny spot for your compost container, observe how sunlight falls on different areas of your yard during various times of day. Look for places where direct sunlight is consistent and intense, ideally between 4-6 hours daily. A location that receives morning sun is often ideal, as it allows the compost to dry out slightly after overnight moisture loss. Avoid spots with trees or buildings casting shadows, which can lead to anaerobic conditions and reduced decomposition rates.
Consider the climate in your area too – if you live in a region with intense sunlight, choose a spot that provides some shade during peak sun hours to prevent overheating. On the other hand, if you’re in an area with limited sunlight, select a location that receives supplemental lighting from nearby structures or trees.
When assessing potential locations, take note of any obstructions, such as garden beds or pathways. Ideally, place your compost container at least 10 feet away from these features to ensure easy access and prevent interference with nearby plant growth. By choosing a spot with adequate sunlight, you’ll set your composting system up for success and promote optimal decomposition rates.
Avoiding Pests and Rodents
When selecting a location for your DIY compost container, it’s essential to consider how to minimize the risk of attracting pests and rodents. These unwanted visitors can be attracted by food sources, including the decomposing organic matter in your compost.
Choose a spot that is at least 10-15 feet away from any buildings or living areas. This will help prevent pests like mice and rats from being drawn to their potential food source. Consider placing your compost container near a water source, but not directly beneath a downspout where excess water can accumulate and attract pests.
Also, keep in mind that certain plants, such as fruit trees or berry bushes, can attract rodents looking for food. If you have these types of plants nearby, consider moving your compost container to a different location. Avoid placing your container near gardens or vegetable beds, as pests may jump from the compost to the surrounding plants.
By considering these factors and choosing a strategic location, you can reduce the risk of attracting pests and rodents to your DIY compost container.
Materials Needed for Building a Compost Container
To get started on building your DIY compost container, you’ll first need to gather some essential materials that will help you create a functional and efficient composting system. Check out this list of necessary items below.
Selecting the Right Bin Size
When selecting a bin size for your DIY compost container, consider the average daily food waste generated by your household. A typical family of four produces around 3-5 pounds of scraps per day. For smaller households, aim for a bin with a capacity of about 12-18 cubic feet. Larger families or those with more extensive gardens may require bins with capacities ranging from 24 to 36 cubic feet.
Keep in mind that overfilling your compost bin can lead to inefficiencies and unpleasant odors. A general rule of thumb is to maintain an average depth of 3-4 feet of waste within the bin. This allows for adequate aeration, facilitates decomposition, and minimizes the risk of pests and diseases. If you’re unsure about the right size for your needs, consider the following factors: available space for the bin, expected volume of waste, and desired composting rate.
In practice, a larger bin may be beneficial if you have a high-volume food waste producer or plan to add yard trimmings, which take up more space. Conversely, smaller bins are ideal for compact spaces or minimal waste generation. Ultimately, choose a size that balances your household’s needs with the available storage area.
Choosing a Durable Material
When selecting materials for building a compost container, durability is a crucial consideration. You want to ensure that the container can withstand the rigors of outdoor weather conditions and regular use without compromising its structure or functionality. A durable material will save you from frequent repairs and replacements, making it a cost-effective choice in the long run.
Consider using materials like recycled plastic, metal, or cedar wood for the frame and walls of your compost container. These options are resistant to rot, insect damage, and harsh weather conditions. Recycled plastic containers, for example, are made from high-density polyethylene (HDPE) that is UV-resistant and can withstand extreme temperatures.
When evaluating durability, also think about the material’s weight capacity and how it will hold up to moisture accumulation. A heavy container with a waterproof lining can prevent leaks and waterlogged soil. For instance, a metal container with a rust-resistant coating can ensure years of reliable service without corroding or decaying. By prioritizing durability in your material selection, you’ll be able to enjoy stress-free composting for months to come.
Designing Your DIY Compost Container
To create a functional and effective compost container, you’ll need to consider factors such as size, material, and accessibility. Let’s break down the essential elements to keep in mind when designing your DIY setup.
Simple Bin Designs for Beginners
For beginners, simplicity is key when designing a compost container. Two of the most straightforward bin designs are rectangular and circular shapes. A rectangular bin is easy to build using wood or recycled materials, and its flat sides make it simple to access the compost pile. You can also use a rectangular bin as a starting point for more complex designs.
A circular bin, on the other hand, offers excellent space efficiency, allowing you to maximize your yard’s real estate without sacrificing accessibility. Circular bins are often less expensive than their rectangular counterparts and require minimal tools to build. If you choose to go with a circular design, consider using a plastic tub or a wooden barrel as your base.
When building either type of bin, remember to include features that will help maintain airflow and temperature control within the compost pile. A simple lid or door can be added to both rectangular and circular designs to allow for easy access and monitoring of the composting process.
Customizing Your Compost Container
Consider adding a lid to your compost container for easier turning and aerating of the pile. A removable lid also allows you to inspect the contents without fully opening the bin, reducing odors and pests. You can choose from different types of lids, such as a simple mesh screen or a more complex hinged design with a locking mechanism.
For added convenience, think about installing wheels or casters on your compost container. This makes it easier to move the bin around your yard, allowing you to rotate the pile for optimal decomposition and reducing strain on your back. When selecting wheels, choose sturdy ones that can support the weight of the filled bin.
Another customization option is incorporating a worm exit tunnel into your design. If you plan on using red wiggler worms in your composting process, this feature allows them to escape when they’re finished breaking down food waste and move into their bedding area. This helps maintain a healthy balance between microorganisms and worms in the compost pile.
Building the Compost Container Frame
To build a sturdy compost container, start by constructing its frame using durable materials that will withstand outdoor elements and heavy loads. Choose wood, metal, or recycled plastic for this purpose.
Creating a Sturdy Base
When building a sturdy base for your compost container, choose materials that can withstand moisture and weight. Wood is a popular choice, but it may rot if exposed to excess water. Consider using pressure-treated wood or hardwoods like cedar or cypress instead.
Alternatively, you can opt for recycled plastic lumber (RPL) or composite decking material. RPL is durable, resistant to pests and decay, and can withstand harsh weather conditions. It’s also eco-friendly since it’s made from recycled plastic waste.
Regardless of the material you choose, ensure the base is at least 1-2 inches thick and has a smooth surface for easy cleaning. A flat, level base is crucial as it prevents water from accumulating and reduces the risk of collapse. You can attach the base to a foundation or directly to the ground using screws or brackets.
If using wood, pre-drill holes for screws or nails to prevent splitting. For RPL or composite materials, follow the manufacturer’s instructions for assembly and fastening. A sturdy base will provide a solid foundation for your compost container and ensure efficient decomposition of organic matter.
Assembling the Bin Walls
Begin by cutting four pieces of 1-inch thick plywood to size for each side panel. The panels should measure 36 inches tall and 48 inches wide. Use a miter saw or circular saw to make precise cuts, taking care not to tear the wood fibers.
Next, cut two additional pieces of plywood to serve as top and bottom panels. These should be slightly smaller than the side panels, measuring 35 5/8 inches long by 47 5/8 inches wide. This will provide a 1/4 inch gap between each panel for easy assembly.
When assembling the bin walls, apply a thin layer of wood glue to the edges of each panel before screwing them together with 2-inch screws. Use a level to ensure the panels are straight and evenly spaced, then attach the top and bottom panels last. The 1/4 inch gap between panels will allow for easy access during composting.
To reinforce the corners, drive a single screw through both side panels and into the corner of each panel below. This will prevent the sides from bowing outward under load.
Adding Composting Features and Accessories
To take your DIY compost container to the next level, let’s discuss some fantastic features and accessories you can add to enhance its functionality and efficiency. These additions will make a big difference in your composting process.
Incorporating Aeration Systems
Aeration systems are a crucial addition to any compost container design. They provide oxygen-rich air pockets, which facilitate healthy decomposition and prevent anaerobic conditions that can lead to unpleasant odors. You can incorporate an aeration system into your DIY compost container using various methods.
One popular approach is to install vents or openings at the top and bottom of the container. This allows for air exchange between the interior and exterior environments, promoting aerobic breakdown of organic matter. Another option is to include built-in fans or blowers that circulate air within the container. For example, you can attach a low-voltage fan to a wooden frame, then insert this assembly into your compost bin.
When designing an aeration system, consider factors like airflow rates, moisture levels, and container size. Typically, 1-2% of the container’s volume is allocated for air pockets or vents. This ratio helps maintain optimal oxygen flow without compromising structural integrity. Ensure that any installed fans are dust-proof and equipped with filters to prevent particulate matter from entering the surrounding environment.
Installing Compost Turner Mechanisms
Compost turner mechanisms are an essential addition to a DIY compost container, making it easier to mix and aerate the pile. When installing these mechanisms, ensure they’re securely attached to the container’s walls or floor. Most turner mechanisms come with mounting hardware, such as screws or brackets, which you’ll need to use according to the manufacturer’s instructions.
Typically, a turner mechanism consists of a long handle connected to a series of paddles or tines that rotate when turned. This design helps break down larger particles and promotes even decomposition. Some mechanisms also feature a spring-loaded or pivoting action, allowing for effortless rotation and reduced effort on your part.
When choosing a compost turner mechanism, consider the size of your container and the amount of material you plan to compost. A larger mechanism may be more suitable for bigger bins, while a smaller one might be better suited for smaller spaces. Always follow the manufacturer’s guidelines for installation and maintenance to ensure optimal performance and longevity.
Maintaining Your DIY Compost Container
To keep your DIY compost container healthy and thriving, you’ll want to regularly check its moisture levels and ensure it’s not too wet or dry. This simple maintenance ensures optimal decomposition.
Understanding the Composting Process
At different stages of decomposition, microorganisms break down organic matter into simpler compounds. Initially, oxygen-loving bacteria like Aeromonas and Pseudomonas start by breaking down proteins and fats. These microorganisms thrive in the aerobic conditions found in most compost piles.
As decomposition progresses, anaerobic bacteria such as Clostridium and Bacteroides begin to dominate. They break down complex carbohydrates into simpler sugars and alcohols. This shift from aerobic to anaerobic conditions often occurs when excess moisture or over-layering causes oxygen levels to drop.
During the final stages of composting, fungi like Aspergillus and Penicillium become active. These organisms further decompose the remaining organic matter, incorporating it into the soil-like structure of mature compost. A well-balanced compost pile maintains a mix of both aerobic and anaerobic conditions throughout its decomposition process. Regular turning can ensure oxygen levels remain sufficient for optimal microbial activity.
Regular monitoring of temperature, moisture, and carbon-to-nitrogen ratios is crucial to maintaining an ideal balance within the composting environment. This allows microorganisms to efficiently break down organic matter without creating a buildup of pathogens or odors.
Troubleshooting Common Issues
One of the most common issues you may encounter is odors emanating from your DIY compost container. This can be due to anaerobic conditions within the pile, where there’s too little oxygen for microbes to break down organic matter efficiently. To address this issue, check that your lid isn’t completely covering the top – allow for a small gap to let in oxygen and prevent moisture buildup.
Another potential problem is pests like rodents or insects finding their way into the compost container. Seal any gaps or holes with a durable, non-toxic sealant, ensuring the edges are secure and smooth. A small minority of DIYers have also reported mold growth due to excessive watering; avoid this by regularly inspecting your pile’s moisture levels.
Regular mixing of the compost materials is essential for preventing matting or clumping, which can hinder oxygen flow. Try to turn your pile at least once a week to maintain uniform decomposition and prevent unpleasant odors from building up.
Frequently Asked Questions
Can I use an existing wooden pallet to build my compost container?
You can repurpose an old wooden pallet as the base material for your compost container. Make sure it’s sturdy and has no sharp edges or splinters that could harm you or attract pests. However, keep in mind that a pallet may not provide adequate ventilation, so consider adding aeration features or using additional materials to ensure proper airflow.
How do I maintain my DIY compost container during extreme weather conditions?
During intense heatwaves or heavy rainfall, your compost container may require extra attention. To prevent overheating, make sure there’s enough moisture in the pile and consider providing shade with a tarp or umbrella. For excessive rain, ensure the bin’s drainage system is functioning properly to prevent waterlogging.
What if I don’t have space for a dedicated composting area?
You can still create a functional DIY compost container by using vertical space or repurposing an existing structure like a shed or fence post. Just be mindful of nearby obstructions and consider implementing odor-control features or a lid with ventilation holes to minimize potential issues.
Can I use my DIY compost container for hot composting, or is it best suited for cold composting?
While your DIY compost container can accommodate both methods, cold composting is often a better fit due to its slower decomposition process. However, if you choose hot composting, ensure the bin has sufficient ventilation and consider adding insulation to maintain optimal temperatures between 130°F to 140°F (54°C to 60°C).

